Friday, November 22, 2013

Wring your mans neck with toothpaste


Ugh... not for dirty collars


Lets say your have a favorite work shirt and there are stains around the collar. Sure if you have long hair and wear your hair down no one will notice those yellow stains sitting on the inside of your shirt. Well your husband or son don't have long hair but they have that favorite dress shirt with the dreaded stain inside that collar. All that stain is, is natural oils and sweat, that your body produces all day long. Don't give up on your shirt just yet if all you have done is thrown it in the washing machine.They say toothpaste can remove those pesky stains. Lets find out.


I used :
toothpaste
toothbrush
5-10 minutes of your time

Dirty Collar


Here is the entire dirty collar


Started off with a pea size of toothpaste.


First, test a small area on the stain to make sure you don't ruin the entire shirt.


So I start scrubbing in circular motion with the toothbrush and noticed the stain appearing darker. I used more toothpaste and kept scrubbing, thinking to myself this isn't going to work.


On the left side of the collar is clean.


I decided to clean the entire collar so you can see before and after.


The entire collar is clean. After I rinsed the shirt with water and threw it in the dryer to see quick results I was amazed that the stains disappeared. It's a shame I threw out some "oldie but goodie" shirts before I ever knew about this trick. So if I haven't convinced you from my previous cleaning projects, I hope you try this one out, especially on men's dress shirts.


Carpet Diem!


Well my carpet has several dirty affected areas. And for people who live in apartments who might not want to invest in carpet cleaning nor pay a fee, I have a possible solution. Some stains might not be so easy to  remove and we feel doomed that we don't  even bother to try to clean  those areas. So I decided to try some simple products to see if we can remedy stubborn stains. Lets find out how we did!


I used:
1 cup of warm water
2 cap sizes of peroxide
1/2 teaspoon of dish soap


First Vacuum your area.


I decided to focus the cleaning on these two spots so I could do a comparison on the rest of the spots.


I ran the brush in circular motion and decided to let the carpet dry.


Final Product


The carpet is better than it was before. I was fortunate to have light colored carpet to see the dirt and the difference in stains. Also I was a little scared with the peroxide but luckily the carpet was not damaged. I feel peroxide broke down the stains without causing any damage. I tried this cleaning method on berber carpet so be sure to test out a corner before applying to other types of carpet. I am pleased with this technique because I had all these home products and it stretches my dollar a little further. Maybe a little more peroxide or soap might do the trick next time.


Sunday, November 17, 2013

Silver Lining


You've had a long day and you still have to attend that little evening dinner party. The accessories you end up wanting to wear is your favorite silver jewelry. The downside to silver is that if you haven't worn it in a couple of months it becomes TARNISHED! If you have jewelry cleaner but not enough time, there is another handy and quick method. All you need is a couple of items that i am sure you have at home.  

The quick fix for today is :
Toothpaste
Tooth brush
Time: 5 minutes

Please excuse my camera. The jewelry may not look tarnished but it is.


Wet the bristle of  the brush with water and use pea size tooth paste.


Can you notice which earring has been cleaned with toothpaste?
One should look more polished.
The one at the top was cleaned with toothpaste.


Two out of three oval rings are cleaned along with the fish so you can see the distinction.


I enjoyed this little project because it was quick and easy. Many apologies for not having an awesome camera, or great lighting, or very tarnished jewelry. If you have tarnished jewelry, I dare you to try it out and send me a before and after picture. Who would have thought your basic staple toothpaste also cleans silver jewelry? Just goes to show you don't need to go to a jeweler to have your silver jewelry cleaned, or buy any chemicals other than toothpaste. I hope you notice the luster and polished look that came from toothpaste and water.

Voilà!  (French expression, for there it is)


Squeegee Clean!


My  sky-rise apartment is located on the 18th floor with a beautiful downtown view of the San Antonio skyline. I am also located next to a high school where there are nice views during a  football game or a high school marching band practicing on the parking lot. Often I have my sliding door open to enjoy the cool breeze and fresh air into the apartment. Now that the season is changing and the days are getting colder I have no choice but to close my sliding door window and view the skyline through dirty windows. 


I decided to give vinegar another shot for a different use. It might hurt economically more to use a bottle of expensive solution so the new scoop online is that vinegar will clean windows just as well as store bought cleaning solutions.

For this cleaning experience I chose to use:
vinegar
bucket
spray bottle
squeegee
15 minutes for sliding door windows
I began to spray vinegar on the dirty windows.


Then I became impatient using my little bottle so I decided grab my bucket. Luckily I already owned a squeegee.I added a cup of vinegar and some warm water, enough to soak the sponge of the squeegee. I used the sponge to glide it across the window and scrape off the dirt.


I left it half clean/half dirty.
I feel with a couple more run-thruoughs the window will improve.

The final analysis shows that vinegar is a cheap way to clean outside windows that are often dirty due to rain and wind. I hardly put any effort into the use of the squeegee. My only complaint is that the window did look a little streaky but it was way better than before. Maybe if I  continue to maintain the cleaning of these sliding door windows more often it will gradually improve and possibly take less than 15 minutes.
My view everyday
(outside sliding door)


San Antonio skyline
(outside sliding door)


Sunday, November 10, 2013

Coca Cola cleans toilets!?

So what happens when you run out of your favorite cleaning products and you don't have time to go to the store? What if all you have is a can of Coke or Diet Coca Cola? Will it clean your toilet bowel? The word around town says that the acids in Coca Cola will eat away at the limescale and calcium. Well, leave it to me to find out if this classic beverage is a "natural" for house cleaning.


For today's adventure all I needed was Coke. So I invested in a generic brand.

I began to pour the coke and splashed it around the trouble spots. If anything, it only enhanced the stains as a reminder that my toilet needed to be cleaned. 


There were no instant changes that made stains disappear or calcium rings vanish away. I decided to brush the hard areas and still saw no change.

So I decided to let it sit for one hour. And still no change.


At the end of hour that was wasted, I decided this experiment was a dud, at least it was on my time and not yours. This idea does not work so don't bother trying it. It was just strange to work with cola in my very own restroom knowing that I sometimes drink it every now and then. Hope this information gets passed on very quickly so we can squash this idea. Till next time.

Splish! Splash! Clean the bath

Well my standard sized tub is in serious need of a cleaning. The chemical spray named Tilex produces wonderful results for cleaning. If you are a big fan of those tough chemicals you know that when you spray down the bathroom tub you have to walk away from the fumes for at least a minute.I love the smell of Ajax which is a  powdered cleansing chemical. Ajax can also be tough on the senses and harsh on the hands. So this time I decided to go green and try something else.


For this project the items you will need are:
baking soda
vinegar
spray bottle
sponge
scrub brush
15-20 minutes


This is the before picture


Step 1: Spray the vinegar on to the tub.


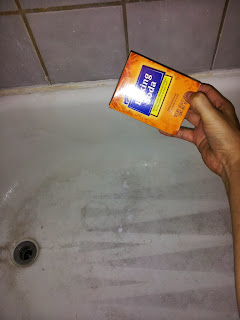
Step 2: Sprinkle the baking soda onto the surface of the tub. 

At this point you can smell the vinegar and hear  the sizzle from the baking soda.

Step 3: Just start scrubbing away! 

Tada!


During this adventurous cleaning, I enjoyed the smell of vinegar. It definitely was not as over powering as the other harsh chemicals. I did not have to walk away during the cleaning process due to the fumes. As I sprinkled the powder around the tub I heard the sizzles of the chemical reaction working hard eating away at the grime. I purposely scrubbed half of the tub and saw that baking soda and vinegar worked just as well as store bought cleaning products. Not only did it do a great job I also noticed that vinegar and baking soda were gentle on the sponge as they were on my hands. The sponge was still intact and my hands didn't feel dry. Enjoy!


Friday, November 1, 2013

Polished Coppa make your Mother-in-law Holla!

So the "in-laws" are coming into town and you know that lady is going to run her two fingers all over your place checking for dust, cleanliness, smelliness! And sometimes if they are "old school" from "back in the day" they might even check those dirty looking pans. Don't have time? On a budget? Last minute cleaning? Here is a shocking solution to quick fix on copper pans. It only involves a little salt, lemon, an ugly rag or paper towel and 15 minutes of your time! I was shocked, impressed and I'm passing on the information to help score some points with the "in-laws".
ITEMS: lemon, salt, rag, dirty pan


Step 1 Rub the lemon on the pan so when you add salt it sticks to the pan.
Step 2 Use little pinches of salt and start rubbing the actual lemon on the pan.
Lemon and salt is amazing


As I started cleaning the pan I noticed results happening withing the first five minutes. I was enjoying the aroma of lemon and was tempted to eat the other half of the unused lemon. It turned into a science experiment for me.


Step 3 Rinse with cold or hot water.
           I just used the white rag to show the actual grime that was      wiped off.


This cleaning session is Clean Bling APPROVED! This concludes my first affordable cleaning option. Hope you are as pleased as was I. This is also an option for youngsters who could learn a thing or two about cleaning without inhaling harsh chemicals. Maybe that mother-in-law will be impressed that you learned this little trick.